Sunday, February 3, 2019

BMW E90 Dash Cam Hardwire

BMW E90 Dashcam Hardwire

My goal here was to have a dash cam setup for driving and parking with wires completely concealed for a fully integrated appearance. My original thought was to use a single Vantrue N2 Pro dash cam with one camera facing rear and one facing front. I planned to mount it on the rear interior lighting module but the front mirror blocks a good view of the road from that angle so I ended up purchasing an additional VIofo A119V2 for the front camera and just used the Vantrue as a rear/interior cam.

Sunday, March 15, 2015

ViseeO Tune2air WMA1000

I finally discovered a better solution than my DIY version for bluetooth music streaming to my 2008 BMW 328xi.  The ViseeO Tune2air WMA1000 just plugs into the little 30pin iPod integration cable in my glovebox and pairs up to any smartphone.  At $85 it's pricey but provides an elegant solution to an annoying problem of mine.

Sound quality is excellent and it fits perfectly into that little section of the glovebox that holds an LED flashlight.  No more having to deal with turning the volume up/down when switching between Radio and Aux inputs!

Just plug it in and pair it up!


As I am streaming from an Android device I don't get any track data or
steering wheel track control functionality unfortunately.


Saturday, November 22, 2014

Behind Sofa Wall Shelf /w Outlets

Here's a random idea for something handy to put behind your couch rather than a sofa table.
Behind Sofa Wall Shelf


This shelf was created for me by Intrigue Custom Creations of Scottsdale, AZ:  http://www.custommade.com/by/intrigue/
4/4 solid red oak was stained /w Minwax 215 and then topcoated /w semi-gloss Arm-R-Seal.  Overall dimensions of the shelf are 120" L x 14" W

Project Drawing:  https://1drv.ms/b/s!AkDiurnLC4Frh6wEO0LJH7Jvu8V5TA

Monday, June 9, 2014

Custom Battlestation Computer Desk Design

This is a design that I previously submitted on Imgur / Reddit.

Yangorang's Custom Battlestation Desk & Mancave


As with most of my custom stuff this was the result of my annoyance with existing products on the market.  I wanted a much larger desk than most as I like to put a lot of stuff on it, and I wanted a keyboard tray wide enough to accommodate my CAD mouse and a super large mouse pad.  While I was at it I stuck in some integrated cord management and a little shelf for my active studio monitor speakers.

Monday, July 8, 2013

Darker than Black Hei's Dagger Replica Project

Darker than Black Hei's Dagger Replica Metal Ver Rev2.5

Thingiverse:  You can download the STL from here to get the prop version printed - note that you will need to sand and paint the part yourself which takes some skill.

Project Overview
Not to be satisfied with other creations I've seen online, I set out to model Hei's dagger from Darker than Black with CAD so that I could have it accurately fabricated for me and easily reproducible.

Here's a rendering of the model I made - I used various screenshots and scans from the series as reference to make it look as authentic as possible.  The layouts that Volphin provides on his website were also a big help, though I did not follow them exactly and you can see the profile in my rendering is a bit different.
Photobucket
I am making a prop version that would be safe for bringing to events as well as a battle-ready metal version that Hei himself could use.  I've made the prop version an open design and anyone who wants it can download the model in .stl format at my Thingiverse.  If you want it in another CAD format shoot me an email and I can export it for you.

The metal version I made more or less exclusively for myself and a few friends.  I'm sure a lot of people would love to have one but few want to pay $500+ to have them custom made.

Please post any thoughts you have in the comments below!

Wednesday, July 3, 2013

HTC One Car Dock from ProClip

I was looking for a good car dock for my new HTC One to use in my 2008 BMW 328xi (E90) and came across the ProClip website:  https://www.proclipusa.com

You choose a mounting base that is custom designed for your car, in my case part number 853598.  This guy clips right on top of the AC vent and is incredibly easy to install.  Whether or not it'll be easy to remove in the future is another question but I won't need to worry about that for a while.

Another customized holder for your phone screws onto the mounting base, in my case 511524 for the HTC One.  (note that you can also choose options with integrated charging)

Once you have everything installed it looks like this:

The grand total for both of these parts was $78.63 shipped which is quite pricey but at least in the future if you get a new phone you only need to buy the phone holder part.  The plastic used is extremely solid (feels like polyamide) and the phone is held very well while driving.  The mounting location is also almost perfect for me as it's easily within arms reach but doesn't block any of my view through the windshield or any of the buttons on the dashboard.

The only issue that I've found is that it can cause a little bit of dashboard creak since it kind of pries the bottom portion of the trim slightly outward, so if you're one of those people who can't stand any creak in their BMW you'd best steer clear.

Overall this is a great product and I highly recommend it to anyone looking for a nice phone car dock.  They have all sorts of solutions for nearly everybody so take a look at their website.

Thursday, April 11, 2013

ODAC Output Switcher

ODAC Output Switcher

I wanted to use my ODAC as my central PC audio device so I needed it to be able to output to either 3.5mm (to headphone amplifier) or RCA jacks (to active monitor speakers), but I didn't want it outputting to both at the same time to prevent unnecessary loading. I ended up implementing a tiny little board that simply routes the audio signals through a 3PDT switch to either output jack. You can see what it looks like in the image gallery above. It doesn't exactly look elegant as I more or less just glued the board to the top of the ODAC case, but it gets the job done.

Monday, April 8, 2013

DIY OVC3860 Bluetooth Receiver / PKB-PCBA Evaluation Board

Introduction
Continuing on my quest to get good audio from my phone to my car's aux in I started playing around with bluetooth receiver modules.  The ElectroDragon PKB-PCBA caught my eye as a fairly easy to implement solution that offers potentially good quality for the price.  It uses the OVC3860 IC which I've heard good things about and also features a SGM4917 headphone amplifier IC which appears to be a fairly handy part with both integrated click/pop suppression and charge pump circuitry to generate it's own negative rail for producing a ground referenced output.  Many of the other similar boards I've seen use a basic opamp with a single supply and bulky capacitors at the output to get rid of the resulting DC offset.  I believe this is the main reason for their poor performance.

As with all of these Chinese made modules English documentation is sparse at best for the PKB-PCBA and ElectroDragon support was utterly useless as well when I tried to ask for more specifications.  Fortunately whoever designed the board had easy implementation as a goal and pretty much all you need to do to use this thing is just feed it power and get your audio output from it.  I don't know the exact schematic of the board but it probably looks similar to this application circuit for the BLK-MD-SPK-B which looks fairly solid to me.

If I wanted a more audiophile grade solution I could try to lay my own PCB using a Roving Networks / Microchip RN52 Bluetooth Audio Module with a TPA6138A2 from TI driving the output, but I don't have the equipment or experience needed to take measurements for optimizing the layout/performance of such a design and it's really just too much work for me.  My approach of using a highly integrated module saves a lot of time and still yield respectable performance.

Note that I tried the Griffin Technologies BlueTrip Aux (it is one of few commercial products low profile enough to plug-in inside my car's center compartment) before pursuing a DIY solution and found that the BlueTrip outputs a low volume signal with completely non-existent bass.  My music simply sounded so terrible that I returned the BlueTrip immediately after testing it.  The funny thing is that I was contacted by another BMW owner about my Amazon review who had the same issue with the BlueTrip so I know it isn't just me.

Friday, April 5, 2013

Mediasonic HFR2-SU3S2 RAID Enclosure Review & Fan Replacement

Introduction
The Mediasonic HFR2-SU3S2 is a nice little USB3.0/eSATA HW RAID box that's perfect for various storage applications. Personally I use it in RAID5 mode over USB3.0 with 4x SAMSUNG EcoGreen F4 ST2000DL004 2TB hard drives for backup and media storage.  It has been working for almost two years now without a single hiccup and even when a hard drive died it proceeded to reconstruct my array with a replacement drive without any problems.

The Mediasonic HFR2-SU3S2 has a reasonable MSRP of $199.99 but can often be found on Newegg with a rebate or promo code (or even both) which brings the price down to around $129.99.  This is a great price for a plug and play USB3.0 hardware RAID box.

Manufacturer Page: http://www.mediasonic.ca/product.php?id=1358153144
Newegg Page: http://www.newegg.com/Product/Product.aspx?Item=N82E16816322004

Build Quality, Features, and Service
The enclosure is constructed mainly of metal and feels very heavy and solid with the exception of the front door which doesn't seem to latch too well and feels rather light and flimsy.  The indicator lights on the front of the enclosure provide some useful information and are laid out in an intuitive and logical manner.  Overall it's a pretty nice looking enclosure and the build quality is much better than you'd expect for the price.

One aspect of the design I don't like is the power brick; the cable for it feels of rather low quality and it's a bit on the short side in my opinion as well.  If I put the enclosure on the top of my desk, the power brick will end up hanging off of the ground because of how they've placed it which is rather annoying.  I'm also not a big fan of the power connector coming in from the side rather than from the back, but this is a fairly minor complaint.  It's would've been better if they integrated the power brick into the enclosure and put the plug in the back much like on the Sans Digital TR4UTBPN.

I use my enclosure in RAID5 mode with 4X SAMSUNG EcoGreen F4 HD204UI 2TB HDDs. (no TLER I believe) The auto USB on-off functionality performs as expected and I haven't seen any disconnect issues like some others report except for one time when I was copying data off of it for 10 hours straight. It randomly powered off during the copy but after I rebooted it I never saw the issue again so I have no idea what happened.

I've shipped this thing across the country three times with hard drives installed - twice in the trunk of my car and once on a domestic plane flight in my checked luggage. (in the original box) After my plane flight I opened up my checked luggage to find the metal HDD retention bracket warped with the drives partially hanging out of the enclosure next to a TSA inspection note.  Upon trying to power the enclosure up the red light next to one of my hard drives lit up to indicate it was bad. (needless to say I was not very happy that day)  I immediately replaced the dead hard drive and the enclosure completed the rebuild overnight without any hiccups.  During this time I was able to access all of my data without any issues, albeit at much reduced speeds.

Mediasonic documentation isn't the best, but the setup is really fairly straightforward and you can get whatever additional help you'll need on the forums.  Generally speaking you only need to consult the manual once to set it up at the beginning and you won't need it for anything afterwards.  Mediasonic support is generally very fast to respond to questions on their forum or via email. I asked for a replacement fan when mine was getting rumbly and received one within only a few days with no questions asked - all I had to do was email them.

CrystalDiskMark Results (USB3.0)
View post on imgur.com

The HFR2-SU3S2 isn't exactly a speed demon but it's respectably fast enough for a budget external USB3.0 RAID array. It's fast enough for me to store and run all my Steam games off of it without load screens feeling particularly long, and loading media files off it is fairly snappy as well.

Final Words
I think this is a great product if you need a 4-bay RAID enclosure; it's not only cheaper than most of its alternatives but offers a good set of features and solid build construction to boot. Mediasonic isn't exactly a well known company, but their support has been more helpful and responsive in my experience than that of many larger companies I've had to deal with.

The Sans Digital TR4UTBPN would probably be the closest competitor to the Mediasonic HFR2-SU3S2 and it's worth looking at as well.  The TR4UTBPN is from a more reputable company and looks to be quite a bit speedier while costing a little bit more.  I am unsure if the Sans enclosure automatically turns on and off with your computer, and this is a feature I use a lot since my RAID array is basically like a secondary drive to the SSD in my desktop.



Friday, February 15, 2013

Car 12V Cigarette Lighter Receptacle Power Isolator Circuit

Introduction
An age-old issue of mine was having to jack the volume on my car stereo (2008 BMW 328xi) way up when playing music from my phone (Galaxy Nexus) over the 3.5mm aux connection.  I actually tried using a bluetooth receiver from Griffin Technologies to solve this problem but only found that I had to jack the volume up even more and that the whole bass-band disappeared when using it as well.

I found, however, that using my Objective2 headphone amplifier to amplify the aux in would both solve my low volume issue as well as make my music sound better in general.  It was clear to me that a basic amplifier typically used for headphones would probably do the job, but I wasn't willing to swap out or recharge batteries every now and then to deal with it. (especially since I'd always accidentally leave the amp on after exiting my car)

The 12V power from a car's cigarette lighter is far from I an ideal power source, and in many vehicles it shares a common ground with everything else in the car.  This leads to a lot of common noise and will also end up blowing up amplifiers using a virtual ground scheme such as the cMoy if you try powering them directly off car power. (as the stereo may also share the same common ground)

Project Overview
I ended up making a fairly basic circuit which consists of only 3 ICs.  It basically takes in the 12V from your cigarette lighter and produces a regulated, isolated 12V output.


This powers a cMoyBB from JDS Labs which is configured with a gain of approximately 5.  Since the cMoyBB board is nice and compact I'm able to cram my circuit in there right next to it.

I'm using pretty much as much heatsinking as possible on the LM2937 as it really does get quite hot.  The cMoyBB only draws about 40mA of current even while playing music into headphones but the LM2937 has to deal with almost 300mA coming into it since it's driving the rest of the circuit.

Saturday, November 10, 2012

Purdue Engineering Fountain Model

Back when I was in high school I was asked by my boss to create a nice gift for a Purdue professor....this is what we came up with.  He was generous enough to give me one too!

Monday, October 22, 2012

Objective2 Headphone Amplifier SS Front Panel

All sold as of 2/20/2013!  I could have another batch made if there is enough demand but so far the batch of 20 has not been profitable for me and it doesn't seem like there is much interest.  Be happy if you're one of the few people that managed to get one!

Introduction
When I decided to build a batch of five O2 amps with my friends I, like many others, went to JDSLabs to order their aluminum front panels.  When I got them, however, I was honestly rather disappointed - it looked all shiny and nice in the pictures on their website but the actual parts I received looked fairly lackluster and were rough around the edges.  I wasn't a big fan of their company logo on the front panel of my DIY amp either.  I decided to fire up my CAD program and look into getting some nice stainless steel panels custom machined for me...

DIY Audio Forum Thread

This revision features chemically etched lettering and symbols filled with black oil-enamel paint and uses a #4 (brushed) finish rather than 2B.  The panel material remains 304 stainless steel and it can be either waterjet, laser cut, or CNC milled depending on my supplier's capabilities.

Overall I think it is much nicer than the panels from either JDSLabs or Head 'n' HiFi though admittedly it's a good deal more expensive to manufacture as well.  You can see from the images that my panel is slightly thicker and fits more tightly around everything.

Here are some images of my initial prototype batch of 20 with Kunshan Krell:
Machined Stainless Steel Objective2 O2 Front Panel
For a production batch of 100 I can easily hit a $12 price point.  The main problem is that I never wanted to commit the investment for such a large batch since this isn't my full time job and I don't want to potentially end up sitting on a large pile of these.

Saturday, June 2, 2012

50->60mm Fan Adapter for ASUS SABERTOOTH P67 Motherboard

I got a bit annoyed at all of the rumbly 50mm fans I had to keep swapping out on my ASUS SABERTOOTH P67 Motherboard and decided to get a little 50->60mm adapter machined for me so I could use a nice 60mm ball bearing Vantec Stealth fan instead.
I tried multiple different 50mm models from EVERCOOL and Rasurbo but all of them started rumbling within a month or so. The 60mm Vantec Stealth has been going strong for almost a year now and yields slightly higher airflow as well.

I use OnlineMachinist for most of my DIY machining needs - they offer reasonable prices and are easy to work with.

Wednesday, April 25, 2012

Linear Regulated USB Isolator

Photobucket Photobucket
Introduction
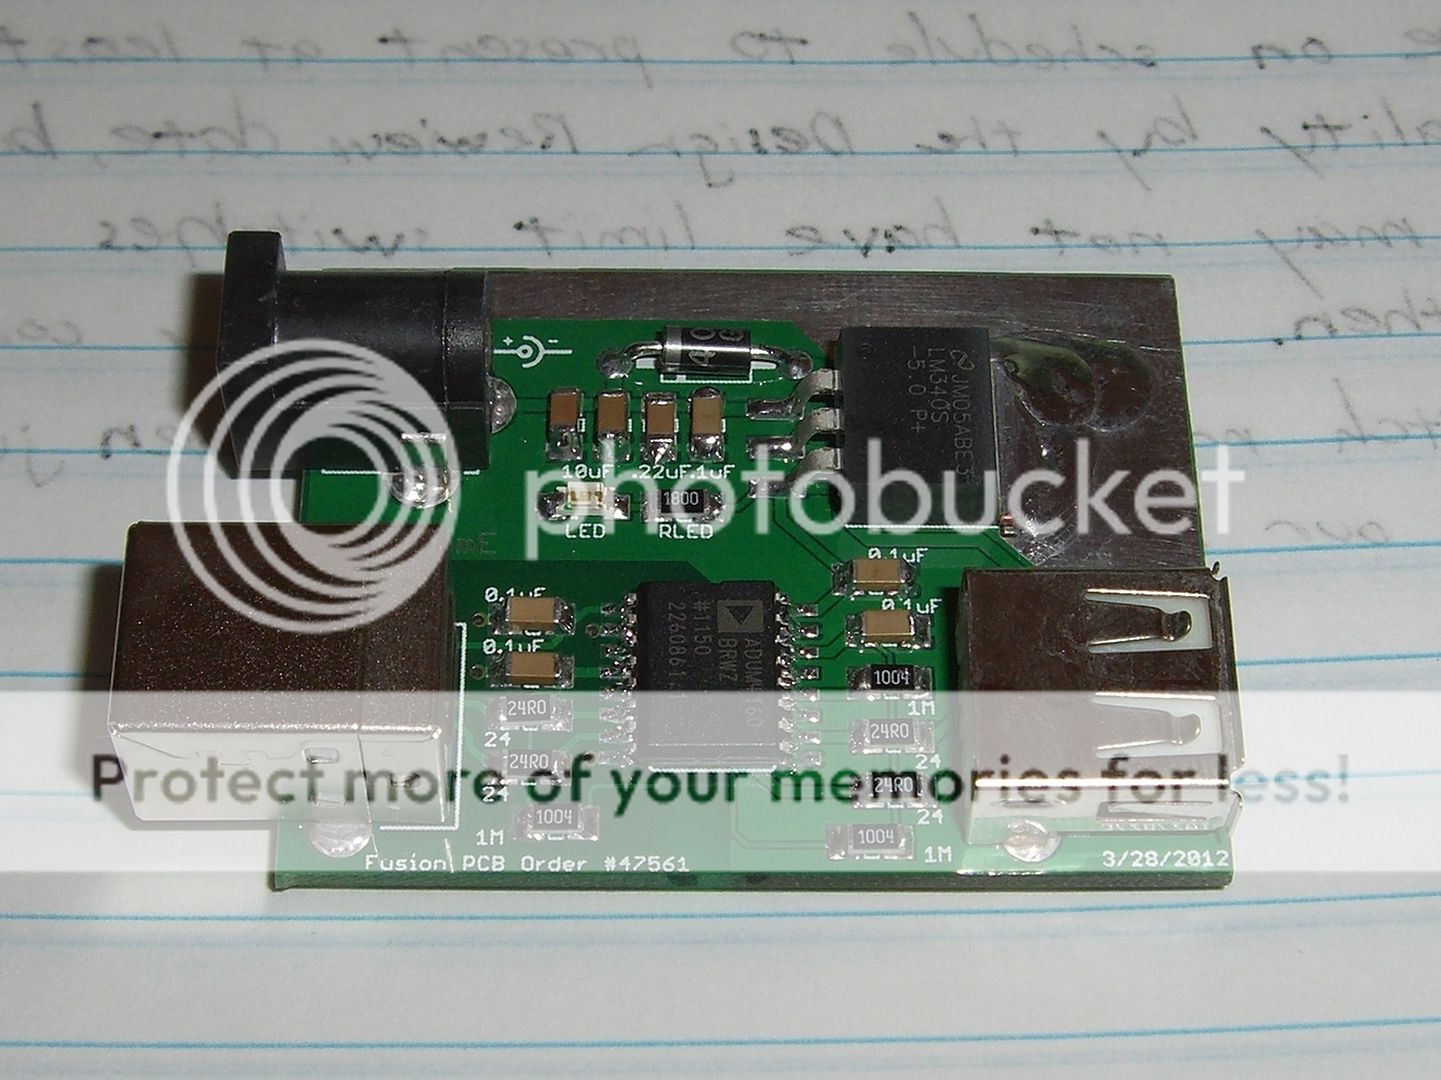
This is a pretty short and simple project – as you might be able to guess from the title it’s essentially an adaption of the USB Isolator from Circuits@Home except with the whole switching power supply section cut out and a LM340-5.0 based linear regulator section spliced in there instead.  The pin header to switch between low/full speed USB mode is eliminated as well and this version is locked to full speed operation.  I've also added in a little power LED to let you know things are working.  Full credit goes to Circuits@Home for an overall excellent original design.

I intend for this thing to be used as a sort of isolator dongle for USB DACs and other devices that want cleaner 5V power than typical switching regulators or USB bus power offer.  The assembly is kept very low profile with the use of mostly SMD parts.

Thursday, March 29, 2012

Sky-Macau PCB Fabrication Service Review

I traditionally use DorkBotPDX for all of my DIY PCB fabrication needs, but for larger boards the flat $5 per square inch cost doesn't tend to work in your favor, so I decided to test out the PCB fabrication service that Sky-Macau offers.

Since I was making a few Objective2 headphone amplifiers with my friends I decided to have five of these PCBs made with Sky-Macau.  I emailed pcb@sky-macau.com with NwAvGuy's O2 project folder and asked for:
-Desired Quantity: 5
-Layers: 2 (4 and 6 also available)
-Color: Green (blue, red, yellow, black, white available)
-Board Thickness: 1.6mm (free for other thicknesses actually)
-Surface Finish: HASL (ENIG available)
-Manufacturing Time: Normal
-Shipping Service: Standard Airmail
-Default copper weight is 1oz but they do have 2oz capabilities

Friday, March 16, 2012

Linear Regulated Power Supply (Fixed)

Introduction
This is an easy to assemble, all-in-one linear regulated power supply solution.  It utilizes a TO-220 form factor positive fixed linear regulator such as the LM340 or LM78xx series and takes an input voltage of up to 35Vpk from a wall transformer based on the regulator used.  The fuse, switch wirepads, and all of the linear power supply circuitry are integrated on one board – it is meant to be used inside of a HAMMOND project enclosure and all it needs is reduced VAC from a wall transformer of your choice to function.  DO NOT connect this directly to the line AC from your wall outlet, as you will simply fry pretty much everything on the board with the high voltage!

I think this project will make a good project for beginner hobbyists or those who need a simple but good LRPS.  I don't intend to sell it as a kit or fully assembled since this is supposed to be a DIY project after all.
I realize that there are a lot of other LRPS designs out there already but I think this one has its merits or I wouldn’t have bothered putting it up.  In fact I’ll list a few alternatives right here for you to check out and compare for yourself:
AnalogMetric LV30 LRPS
NightFire Kit #1772
AMB σ25 Regulated Power Supply


Theory of Operation
A reduced VAC (ex.16VACrms) comes in from your wall transformer to the board.  CSH shunts away high frequency line noise and transients.  Five fairly large reservoir capacitors come after the full-wave bridge rectifier to provide an excellent unregulated DC signal.  A bleeder resistor (R2) is implemented for safety purposes.
 
CBY bypasses the input to the voltage regulator IC and helps reduce input ripple.  The 1N4002 diode is implemented as a protection diode for the regulator IC.  Electrolytic, tantalum, and ceramic capacitors (C5, C6, C7) are paralleled at the output of the regulator in order to provide excellent transient performance and low impedance over a large frequency range.
 
Input/output power and your on/off switch are hooked up by terminal blocks which accept between 26-16AWG.  (I recommend you use at minimum 24AWG)  I find that these work fairly well and provide an easy means of wiring stuff to the PCB.  A fairly large ground plane is implemented in order to reduce noise and minimize stray inductance among other benefits.

Project Resources
Schematic
Board Layout - Board layout is 1:1 scale so you can print it out if you want to get an idea of the dimensions

Sunday, March 4, 2012

DPScope SE - Cheapo Oscilloscope for DIYers

Photobucket

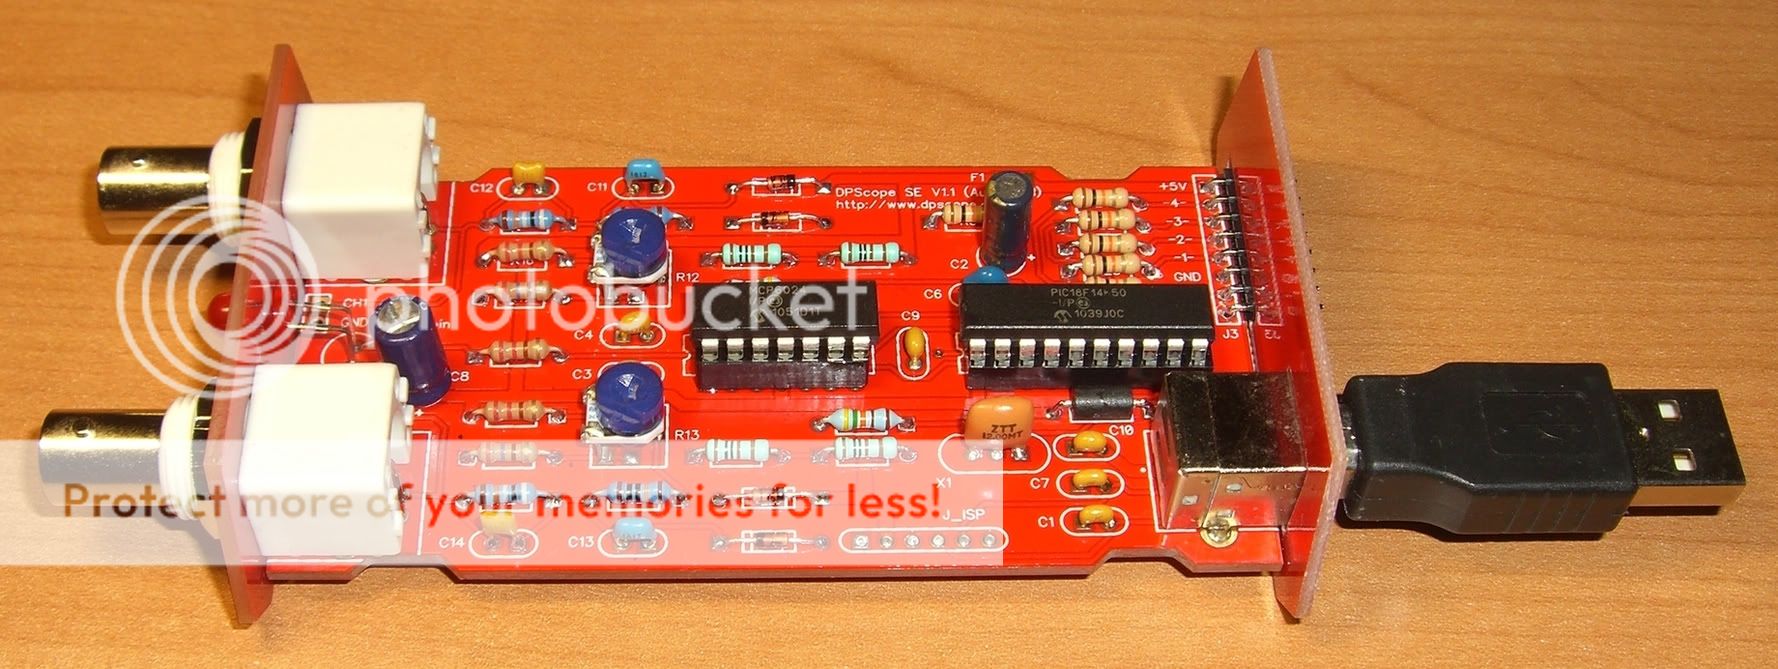
If you need a very basic oscilloscope for DIY use then definitely take a look at the DPScope SE.   It sells for under $60USD as an unassembled kit that includes everything you'll need minus the probes and the USB cable.

Bandwidth, sampling rates, and resolution are quite limited but for the price you still still get an excellent set of features including triggering and FFT spectrum analyzer functionality and you won't be able to beat the price for a two-channel oscilloscope / logic analyzer.  The software is fairly well done too and I find it very easy to use.  ADC sensitivity is around 4mV and there is no AC coupling mode, but you can achieve AC coupling by means of a series capacitor.  [Specs page]

The DPScope is also very easy to assemble (if you're reading this I assume you have prior soldering experience anyway) as it utilizes only through-hole parts and excellent documentation is provided.  I was able to get it up and running in one go. Assembly time took approximately two hours for me and I'm a pretty slow solderer.


Most people will probably tell you to get real oscilloscope and I'd have to agree if you want to do serious work, but the DPScope SE definitely performs as advertised and if that's all you need then go for it.  I'll probably be buying a Rigol 1052E, Instek GDS-1052-U, or a OWON PDS5022S after I move.

Wednesday, February 29, 2012

Use TVBR AAC-LC Instead of MP3 for your Music Collection

MP3 is seriously outdated people…and so is NeroAACenc.  There are better options out there now and keeping your audio in AAC-LC format at TVBR127 quality gives you excellent audio quality along with small filesizes.
Lack of encoding utilities for doing this is somewhat of an issue…but you can have foobar2000 and QAAC encoding to AAC TVBR127 fairly quickly and painlessly.
Basic steps:
  1. Download and install QuickTime
  2. Download and extract QAAC
  3. Download and install foobar2000
  4. You can access the foobar2000 converter by right clicking a song or songs within foobar2000 and going to Convert -> …
  5. See screens below; foobar essentially decodes the file you’re converting to a temporary wave file and passes it to QAAC along with the custom commands you put in the “Parameters”
  6. Convert!
I guess you could always keep your whole collection in FLAC as well if you have the space…but I think that TVBR 127 is the new best lossy audio format vs MP3 320KBps that a lot of people still seem to be using.


Sunday, May 15, 2011

ThinkPad T420s Review

A little gallery to go along with it: http://photobucket.com/t420s

My Config
  • Type:  4170-CTO
  • Processor:  Intel Core i5-2540M Processor (2.6GHz, 3MB L3)       
  • Operating system:  Windows 7 Home Premium 64 -> clean installed Windows 7 Ultimate x64 on UEFI
  • Display type:  14.0 HD+ (1600 x 900) LED Backlit Antiglare Display        
  • System graphics:  Integrated Intel HD Graphics 3000
  • Total memory:  2 GB DDR3 - 1333MHz (1 DIMM) -> Upgraded to 8GB Samsung RAM ordered off Amazon
  • Pointing device:  UltraNav with TrackPoint & TouchPad plus Fingerprint reader       
  • Camera:  720p HD Camera       
  • Hard drive:  250 GB Hard Disk Drive, 5400rpm -> Upgraded to Intel 320 series 160GB SSD
  • Optical device:  DVD Recordable       
  • System expansion slots:  Express Card Slot & 4 in 1 Card Reader       
  • Battery:  6 cell Li-Ion Battery - 66+ and ThinkPad Battery 42 (UltraBay Battery III)
  • Power cord:  Country Pack North America with Line cord & 65W AC adapter
  • Wireless LAN adapters:  Intel Centrino Advanced-N 6205 (2x2 AGN)
Awesome Features
  • Excellent ThinkPad keyboard and TrackPoint as usual, still the best in the industry even though they never really change all that much; I'm a regularTrackPoint user myself and the EliteBook "PointStyk" is just horrendous (same with the DELL & Toshiba pointing sticks)
  • Relatively good battery life in a lightweight, compact form factor; no need for big, clunky batteries to last through a day (still less battery life than the T420/T520 though sadly even with the bay battery)
  • Relatively good build quality holds true, along with the classic matte finish which I like a lot; the nice non-slip finish makes it easier to grip than most other laptops
  • Excellent VOIP call quality with VOIP mode enabled from the audio control panel; good webcam quality as well
  • Really no crapware at all installed on the stock OS that Lenovo ships out; you actually don't have to do a clean install to have a usable and quick system; ThinkVantage power manager is quite handy as well and I like it a lot
  • Extremely speedy performance and boot times (using the fingerprint reader security does slow down the boot a bit though - I hope Lenovo works on making this faster)
  • Being able to swipe your finger to bootup your computer is a nice little feature that I use on a regular basis
  • InstantResume is quite handy for when I move between locations and I use it quite often
  • You get a USB3.0 port unlike the rest of the T series...this is sadly one of the major reasons I didn't go for a T420 or T520
Terrible Annoyances
  • Mediocre viewing angles for the screen as usual...it gets the job done...but I wish they would just stick IPS screens onto all ThinkPads; I could never understand why they think business users don't need decent screens
  • Found a little bit of flex in the lower right corner of the keyboard, (fixed with a bit of duct tape) as well as around the power/mute button area; there's a little bit of creaking in the lower left corner where the HDD cover is as well  (EDIT:  now fixed after I sent it in to the service depot)
  • Some kinks to work out with the fingerprint reader software/driver and UEFI installations of Windows; fingerprint functionality is not as streamlined as HP EliteBook's implementation in my opinion (using it seems to slow down the ThinkPad boot time)
  • Fan is rather noisy and seems to be spinning up and down all the freakin time - already tried all the different fan settings in TV PowMam - temps are a bit higher than I'd expect as well; I suggest you use TPFC if you want to keep fan noise down; there is a huge thread raging on about this right now at the Lenovo Forums
  • UltraBay devices seem to be wobbling around inside the UltraBay slot since there is just too much free space in there; this is especially annoying with the optical drive because it is sorta clanking around noisily in that UltraBay when you are reading/burning discs; not sure if this is a design level or manufacturing level issue but I wish it would fit more snugly and seamlessly in there (not fixed at service depot when I complained about it)
  • Hinge is a bit flappier than I'd like - I wish the screen would hold itself in one position a bit better, as when I set the laptop down sometimes it'll end up falling back a bit
  • I feel port placement could've been slightly better on the sides - they should've been able to squeeze at least another USB/eSATA combo port in there
  • Odd bug where screen switches over to 50Hz when you unplug from a power source - does not switch back to 60Hz when you plug back in; probably just a minor software bug  (fixed I believe)
Other Notes
  • Fingerprint reader on T420s is a bit narrower than I'd like, but it also seems to be a bit more responsive than others I've dealt with
  • Speakers are better quality than they used to be….I think...but I suppose that isn't saying much, as they're still worse than what you'd find on most consumer laptops
  • Still wish there were HDMI on all ThinkPads, as VGA is becoming seriously outdated and DisplayPort is nowhere - even at work all the projectors have HDMI

Bottom Line
  • Is the T420s really all of the power of the T420 in a slimmer form factor with no compromises?  Pfft no...The T420s is definitely less sturdy, runs hotter, has less ports, and has less battery life/options than its big brother, but if you're enough of a maniac to give all that up to get a laptop that's a good pound lighter and a bit slimmer....then go for it...

Saturday, January 15, 2011

HP Business Outlet Review

HP Business Outlet

As I haven't seen many testimonials out on the internet from people who have ordered from the HP Business Outlet, I thought I'd share my own experience.

The first thing you might notice is that the HP Business Outlet is really just a daily updated list of refurbished computers from HP. One of the issues with this is that the laptops are taken throughout the day and when you call to order you may find the model you want has already been sold. If you are interested in ordering from the outlet try to have a good 2-3 options in mind when calling so you have a good chance of getting one. I was lucky and was able to get my first choice part number though.

The prices they list are very reasonable and when I ordered there was an additional 20% off promotion on all clearance section business computers. As a college student, I had been wanting a nice but reasonably priced business-class laptop for some time and I was able to snag a EliteBook 8440p (Core i5, 2GB RAM, WebCam, 250GB HDD...) for only $658.91 including shipping and taxes. I would consider that to be an extremely good deal considering that those things normally cost well over $1K and at best even the ThinkPad T410 I was also considering would've cost at least 100-200 dollars more.

The orders are done fully through the phone, and hold times could potentially get long at certain times; I waited only about 5 minutes though which isn't bad at all. It is somewhat annoying that you really have to make sure they get every letter of your address and email and all that correctly over the phone, but the HP rep was professional and easy to work with. Naturally he tried to sell me a couple of extra accessories to go with the EliteBook I was ordering but when I said I didn't need them he didn't ask twice.

I placed my order on 11/30/2010 and I received a Fedex tracking number promptly the next day. I received my EliteBook on the morning of 12/3/2010, so I got this thing about as fast as I would get any web order from Newegg or Amazon. Kudos to the HP Business Outlet and Fedex for speedy service.

Now on to the actual laptop…
You can see pictures of exactly what I got here: EliteBook 8440p Photobucket Gallery
The unit I received was more or less in like new condition, except for a small scratch or two on the lid (which probably happened during shipping as they didn't even put the thing in plastic wrap) and the Microsoft sticker peeling off on one edge. I'd say they should've done a bit better of a job with packaging, but other than that my laptop has been working great and I really like it. I won't bother to review the 8440p in particular as there are plenty of those on the web already, but I will say that I really like the brushed metal look and feel, and that it is a very solid laptop overall. I also think that your mouse-input options on the ThinkPad T-series are a bit better, but the EliteBook in my case was a better value and actually has a more solid feel in my opinion.

I would definitely recommend taking a look at the HP Business Outlet to anyone who is looking for a nice machine on a budget; they have an excellent selection at reasonable prices and if something does break you have a 1yr standard HP warranty to cover your back. My experience was quite positive overall and I hope it will be the same for all of you as well. Thanks for reading!